Get started with IPBlock
Set up IPBlock for the first time
Create and activate your account
- Create an IPBlock account. If you have an IPBlock account already, Log In.
- Confirm email address. After you registered, we will send you a confirmation email. Please check your email and follow the provided link. If you haven't received the email, please check the SPAM folder first. You can resend the confirmation email after one hour.
- Select a subscription plan to try for free. Read more about subscriptions.
-
Enable 2‑factor authentication (optional but highly recommended).
To provide you with enhanced security, IPBlock requires 2-factor authentication for all users.
- Download an authenticator app on your mobile device. We recommend Google Authenticator (download for Android or iOS), but IPBlock also works with Authy (Windows, Mac, Linux, SaaS, iPhone, iPad, Android), Microsoft Authenticator, Android andOTP, FreeOTP (Android & iOS), as well as many others.
- Click on Connect Device on the Authenticator Devices page. Connect Device dialog with a QR code will show.
- Scan the QR Code using the Authenticator app.
- Enter the PIN from the Authenticator app in the Connect Device dialog PIN field and press the OK button.
Setup your servers
Step 1. Create IP Multiset
IP Multisets are combined sets of IP ranges that the IPBlock would block, mark, or redirect. IPs that are not included in an IP Multiset are let through unaffected.
To create an IP Multiset:
To create an IP Multiset:
- Open the IP Multisets page and click Add Multiset.
- Enter an IP Multiset name. The name must be between 3 and 32 characters long and may include latin letters, numbers, dashes, underscores, and spaces.
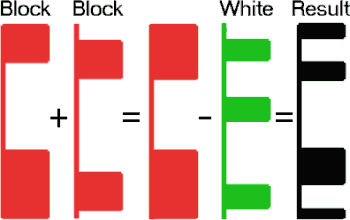
- Select which IP Sets to block. Select one or more Built-in IP Sets or create one or more Custom IP Sets.
-
(Optional) Select IP Sets to whitelist. Open the White List tab and select
IP Sets to whitelist. White List components take precedence over the Block List.
 It is recommended to create a custom IP set with internal owner IPs and always include this set in
the White List to avoid self-blocking, especially for administrative access.
Step 2. Create New Rule
A Rule is a set of conditions to block IP packets or process website requests. For a Rule to take action on a packet or request the source IP address must be included in the Multiset and all the Rule criteria must be true. If there is any mismatch, the Rule simply ignores the packet or request. Read more about Rules here.
To create a new Rule:
To create a new Rule:
- Open the Rules page and click New Rule.
- Enter a Rule name. The name must be betwen 3 and 32 characters long and may include latin letters, numbers, dashes, underscores, and spaces.
- Select a Rule Type. Read on how to choose the right Rule type.
- Select Rule parameters. Rule parameters depend on the selected Rule type. Read more
- Click OK.
- (Optional) Setup Rule Tracking. For mark or redirect website rules you may set Rule Tracking.
Step 3. Connect Server
To connect a server with the IPBlock portal:
- Open the Servers page and click Connect Server.
- Follow the directions to install the IPBlock client software on your server and register the server with the IPBlock portal. Read more about the IPBlock client software installation process and the available options.
- After the server is registered, it is listed on the Servers page.
Step 4. Attach Rule to Server
To attach the Rule created in Step 2 to the Server connected in Step 3:
- Open the Servers page and click Rules.
- Click Add Rule.
- Select a Rule. If the Rule is a website Rule, also select a website name.
- Apply the configuration changes.
Step 5. Monitor
Monitor the performance of the Rule using one of the following methods:
- On the Dashboard. Open the IPBlock Dashboard. The dashboard shows the current utilization of subscription package features, as well as the real time status of IPBlock on all connected servers.
- On Windows Server with Desktop support. Find IPBlock icon in the Windows System Tray and click on it. Select a website name or "Firewall" (to monitor Firewall type Rule) from the dropdown and monitor the rules performance. If there's no IPBlock icon in the Windows System Tray, launch the IPBlock Monitor app from the Desktop icon or the Windows Start Menu. Make sure you selected the IPBlock Monitor app during the IPBlock client app installation.
- On Windows Core Server. Use IPBlock command-line tool. Run ipblock command. Make sure you selected the IPBlock Command-line tool during IPBlock client app installation.