IPBlock help
If you are new to IPBlock, consider reading the Get Started guide.
You can find answers to frequently asked questions here.
IP Multisets
Multiset is an IP set (list of IPs) produced as a combination of individual IP set components by merging and exclusion. You may create, edit, and delete IP Multisets on the IP Multisets page. When creating an IP Mulitset you may select from build-in IP Sets and Custom IP Sets to be included in either the Block List or the White List.
Built-in IP Sets
- Country sets. A very accurate and up-to-date database organized by regions.
- Search Engines. In this category, there are multiple sets for the first- and second-tier search engines, as well as research, analytics, and social crawlers.
- Data Centers. A pair of sets for the known and detected data centers (clouds as well as single disparate servers). Medium confidence set is somewhat wider at the expense of slightly higher probability of false positives.
- Compromised Computers. Sources of traffic with recorded malicious, suspicious, or clearly abnormal activity.
Custom IP Sets
Create your custom sets for whitelisting or blocking and use them by themselves or merge with the built-in sets. An example for whitelisting is making sure your own company IPs are not blocked. Additionally, you can block your competitors and sources of unwanted traffic specific to your application.
- A single IP, as 1.2.3.4
- A CIDR notation, as 1.2.3.0/24
- A from-to range, as 1.2.3.0-1.2.3.100
Block List
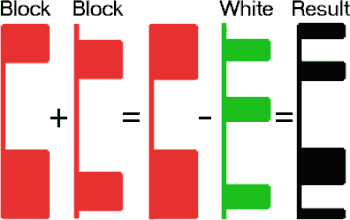
When a Multiset is created, the items selected in the Block List are processed first by merging them into a single set.
White List
After the Block List items are merged, next come While List items when each of them is excluded
from the resulting set.
As the result, no matter what the selections in the Block List are, the resulting Multiset will never include
a single IP from the White List.
Rules
Firewall Rules vs. Website Rules
On an average server, IPBlock can block millions of packets per second on the firewall level and process tens of thousands of HTTP / thousands of HTTPS requests per second on the website level.
The main advantage of the firewall rules is high performance, website rules — flexibility in processing of the requests and the ability of conditional responses. Another major difference is the firewall's ability to filter out any traffic, not just website requests. For example, the firewall can control email or remote administration access ports.
There are multiple possible strategies in combining the benefits of firewall performance with website rule flexibility. One is to create a traffic conditional firewall rule set to activate only in periods of abnormally high requests and a complimentary traffic-unconditional (or lower traffic level) website rule. In this configuration, the server will automatically switch from “polite” blocking to brute force blocking in response to an increase in the magnitude of an attack.
| Feature | The best choice |
|---|---|
| The highest performance | Firewall Rules |
| Filter all server traffic | Firewall Rules |
| Control only website traffic | Website Rules |
| Ability to redirect traffic | Website Rules |
| Ability to analyze traffic | Website Rules |
Rule logic
A Rule is a set of conditions to block IP packets or process website requests. For a Rule to take action on a packet or request the source IP address must be included in the Multiset and all the Rule criteria must be true. If there is any mismatch, the Rule simply ignores the packet or request.
Setting up Rules
To set up any type of Rule, you need to select a name, type, and a Multiset. Depending on the selected type, further selections change. Optionally, you can set a traffic level condition to enable or disable the Rule when incoming traffic reaches a set threshold.
Firewall rule
- Inbound ports. See also Port selection section below.
- Protocol: TCP, UDP, or both
- Network Categories: any combination of Public, Private or Domain network types (applicable to Windows only, has no effect on Linux)
Port selection
- 20 - File Transfer Protocol (FTP) Data Transfer
- 21 - File Transfer Protocol (FTP) Command Control
- 22 - Secure Shell (SSH)
- 23 - Telnet - Remote login service, unencrypted text messages
- 25 - Simple Mail Transfer Protocol (SMTP) E-mail Routing
- 53 - Domain Name System (DNS) service
- 80 - Hypertext Transfer Protocol (HTTP) used in World Wide Web
- 110 - Post Office Protocol (POP3) used by e-mail clients to retrieve e-mail from a server
- 119 - Network News Transfer Protocol (NNTP)
- 123 - Network Time Protocol (NTP)
- 143 - Internet Message Access Protocol (IMAP) Management of Digital Mail
- 161 - Simple Network Management Protocol (SNMP)
- 194 - Internet Relay Chat (IRC)
- 443 - HTTP Secure (HTTPS) HTTP over TLS/SSL
- 3389 -Remote Desktop
- 49152–65535 - Ephemeral ports NOT RECOMMENDED See details
Website blocking rule (Windows only)
- HTTP status code.
- Static Response. You may select one of the preloaded Static HTML Responses.
Static HTML Responses (Windows only)
Use the Static Responses page to upload a static HTML file. When uploaded, you may use the file as a response for a website blocking rule(s). The file must have an extension of HTML or HTM and not to exceed 100 Kb in size.
Website redirect rule (Windows only)
For a website redirect rule, the only selection is a redirect URL that can be either absolute or relative. Optionally, for redirect tracking (programmatic process of the reason for the redirect), two parameters can be imbedded in the URL format: a Tracking ID {tid} and a country code {cc}. An example: http://access-denied.mydomain.com/403.php?cc={cc}&tid={tid}
Website mark rule (Windows only)
- Country code header. The header name is Local-IPBlock-Country. The header value is a ISO 3166-1 alpha-2 country code. Example: Local-IPBlock-Country: fr (mark the request as initiated from France)
- Tracking ID header. The header name is Local-IPBlock-Tracking. The header value is a Tracking ID.
Rule tracking
Rule tracking is only applicable to mark or redirect website rules and provides for conditional response to the end user based on the reason the match occurred in the IP Multiset.
For example, if a Multiset contains a number of countries, you can design an application to respond to end users from different countries in their own language. Alternatively, you can give a different response to requests originating from data centers than from any other sources. Another reason for tracking is collection of statistics.
Country tracking is always enabled for redirect rules. To enable Country Tracking for a mark website rule, check the Country Tracking checkbox in the corresponding rule settings.
- Open the Rules page.
- Select a mark or a redirect rule and click Tracking.
- Click New ID.
- Enter a Tracking ID. The Tracking ID must be 2-5 characters long. Only Latin letters, numbers, dashes and underscores are allowed.
- Select the IP Sets you want to be associated with this Tracking ID.
- Click OK.
- Created Tracking ID is passed as either the {tid} parameter of a Redirect URL (website redirect rule) or a value of the custom HTTP header (website mark rule).
Subscriptions
IPBlock has partnered with Stripe.com to provide billing, subscription management, and payment processing. Please refer to Stripe.com for the relevant terms of service and privacy practices.
Free Trial
IPBlock offers a free 15-day trial for all of our plans for new customers, so our product can be evaluated risk free. At times we may offer additional promotions for new customers.
Upgrades and Downgrades
IPBlock plans can be changed at any time. If you change your subscription, you will not be billed immediately.
Instead, you will receive a proration adjustment for the next billing cycle.
If you upgrade your subscription in the middle of the billing cycle, the next bill
will include an additional charge for the prorated increase in the subscription price
in the current cycle. If you downgrade your subscription, a prorated credit will be applied instead.
Change your subscription plan.
Changing Payment Method
To update your payment method go to: Manage subscription.
Cancelling
IPBlock plans can be canceled at any time and for any reason by our customers. If the plan is canceled before the trial period, the customer’s credit card will not be charged. If the plan is canceled after the trial period is over, no further charges will be made. IPBlock does not offer any refunds for any unused time.
To cancel follow: Account > Manage subscription > Cancel plan.
Portal Access
2-Factor Authentication / OTP
IPBlock uses One-Time-Password (OTP) for 2-factor authentication. The main OTP method is with special authenticator apps. IPBlock can work with any of the most popular ones including Google Authenticator, Authy, Microsoft Authenticator, andOTP, FreeOTP, as well as many others. It is possible to have multiple authenticators linked.
Access recovery
In the event that your authenticator device is not available, and for recovery only, you can restore access to the portal with OTP sent via SMS, phone call, or email.
Client Software
All genuine IPBlock client software for Windows is digitally signed by Delaflex, Inc. (the IPBlock parent company) with an EV code-signing certificate issued by Sectigo, a trusted root authority. We strongly recommend verifying the signature and the certificate chain to the trusted root authority before attempting an installation of the software. This check not only assures the software authenticity but also integrity. Windows® drivers are also co-signed by Microsoft® to make sure your server is secure and stable.
IPBlock Client Software for Windows
System requirements
Prerequisites:
- .NET Framework 4 Runtime. See step 5 below to enable.
- IIS & ISAPI Filters Windows Components (Website Rules only)
If you plan to use website rules, enable IIS with ISAPI Filters windows components prior to the
installation.
To install using GUI:- Start Server Manager.
- In Server Manager, click the Manage menu, and then click Add Roles and Features.
- In the Add Roles and Features wizard, click Next. Select the installation type and click Next. Select the destination server and click Next.
- Optional, to enable Website filters: On the Server Roles page, expand Web Server (IIS), expand Web Server, expand Application Development, and then select ISAPI Filters. Click Next.
- Required: On the Features page, expand .NET Framework 4.x Features, and then select .NET Framework 4.x. Click Next.
- On the Confirm installation selections page, click Install.
- On the Results page, click Close.
Required, enable .NET Framework:Install-WindowsFeature NET-Framework-45-CoreOptional, to enable Website filters:Install-WindowsFeature Web-ISAPI-FilterIf you do not have both IIS and ISAPI Filters features enabled on your server, the Website Rules component will be hidden during the installation process and you won't be able to add Website Rules to the server.
Installation
Download the provided installer. Before running the installer we recommend verification of its digital signature. In GUI, right click on the file and check Properties. In Powershell: Get-AuthenticodeSignature IPBlock.msi During the installation, you have a choice of selecting components to enable Firewall Rules and/or Website Rules. Select either one or both. At least one is required for the client to be functional. You can also choose whether to install IPBlock Monitor, a desktop app used for initial setup and registration of the client software, as well as monitoring its function. It also provides a command-line alternative to the Monitor, which is especially useful on Windows Core servers.
Usage
GUI Monitor runs in the tray or is available via the Programs and Desktop shortcuts. To use the command-line tool start an elevated command prompt and type ipblock to see the status or ipblock /? to see the list of the available commands.
Update
To change automatic updates settings:
Using IPBlock Monitor: use checkbox "Keep IPBlock up to date" in File/Settings.
Using command line:
To enable automatic updates:
IPBlock /updates on
To disable automatic updates:
IPBlock /updates off
To install updates manually follow the installation instructions above.
Removal/Modification/Repair
To uninstall, modify, or repair the software, run the installer again. You may also uninstall the software from the Windows Control Panel, Add/Remove Programs app.
IPBlock Client Software for Ubuntu — x64
System requirements
Ubuntu 18.04 or 20.04 — x64
Installation
- Download IPBlock Debian package:wget https://ipblock.com/UserPortal/Downloads/ipblock-1.3.0-1.x86_64.deb(alternatively, download it directly)
- Verify:
SHA1: 4D3F830ECA998C11031DCBA56647575CB9F6AAF1sha1sum ipblock-1.3.0-1.x86_64.deb - Install IPBlock:sudo apt-get install -f ./ipblock-1.3.0-1.x86_64.deb
Update
To check for updates:ipblock -check-updatesTo disable automatic updates:ipblock -updates offTo enable automatic updates:ipblock -updates on
Removal
To remove IPBlock: sudo apt purge ipblock
IPBlock Client Software for Ubuntu — ARM64
System requirements
Ubuntu 18.04 or 20.04 — ARM64
Installation
- Download IPBlock Debian package:wget https://ipblock.com/UserPortal/Downloads/ipblock-1.3.0-1.aarch64.deb(alternatively, download it directly)
- Verify:
SHA1: A91F30D841E287501EBCCF711D2F7CD95016AF89sha1sum ipblock-1.3.0-1.aarch64.deb - Install IPBlock:sudo apt-get install -f ./ipblock-1.3.0-1.aarch64.deb
Update
To check for updates:ipblock -check-updatesTo disable automatic updates:ipblock -updates offTo enable automatic updates:ipblock -updates on
Removal
To remove IPBlock: sudo apt purge ipblock
IPBlock Client Software for Fedora / RHEL — x64
System requirements
RHEL, Fedora, Cent OS — x64
Installation
- Download IPBlock RPM package:wget https://ipblock.com/UserPortal/Downloads/ipblock-1.3.0-1.x86_64.rpm(alternatively, download it directly)
- Verify:
SHA1: 14B9B2BC03DC0D1E4B7B2C4670F6248677B1997Fsha1sum ipblock-1.3.0-1.x86_64.rpm - Install IPBlock:sudo yum install ipblock-1.3.0-1.x86_64.rpm
Update
To check for updates:ipblock -check-updatesTo disable automatic updates:ipblock -updates offTo enable automatic updates:ipblock -updates on
Removal
To remove IPBlock: sudo yum remove IPBlock.x86_64
IPBlock Client Software for Fedora / RHEL — ARM64
System requirements
RHEL, Fedora, Cent OS — Aarch64
Installation
- Download IPBlock RPM package:wget https://ipblock.com/UserPortal/Downloads/ipblock-1.3.0-1.aarch64.rpm(alternatively, download it directly)
- Verify:
SHA1: F759D8C45D238724677C2696C501F5A82CB0EFDCsha1sum ipblock-1.3.0-1.aarch64.rpm - Install IPBlock:sudo yum install ipblock-1.3.0-1.aarch64.rpm
Update
To check for updates:ipblock -check-updatesTo disable automatic updates:ipblock -updates offTo enable automatic updates:ipblock -updates on
Removal
To remove IPBlock: sudo yum remove IPBlock.aarch64